How to Activate an AGM Battery

Whether you have purchased your first Yuasa AGM battery, or are getting a refresher for your most recent one, learning how to activate an AGM battery may be easier than you think. In only seven simple steps, you can activate your new AGM battery with confidence.
There are some key differences between conventional lead-acid batteries and AGM batteries. To understand them, we will also cover what to expect from your new fresh-from-the-factory AGM. But first, let’s make sure you have everything you need on hand.
Learn How to Activate An AGM Battery
Yuasa Absorbent Glass Mat (AGM) Batteries leave the factory either Factory Activated or Bottle Supplied. It’s important to know the difference between the two states and what it means for your Yuasa Battery:
Related Read: What is an AGM Battery?
How Batteries Leave the Factory
- Factory Activated (FA) – the battery is filled with electrolyte, sealed and charged at the factory. These batteries if not used within a month must be maintained. If the voltage drops below 12.4 these batteries must be boosted up to full charge.
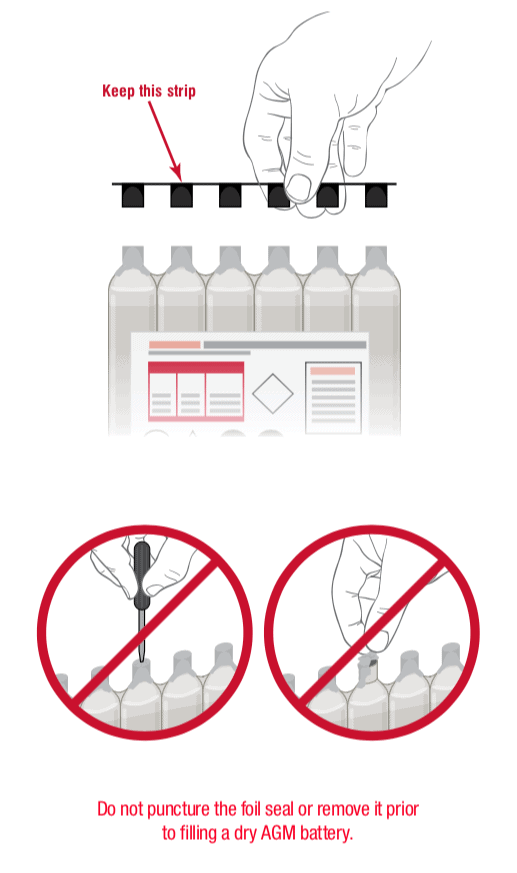
- Bottle Supplied (BS) – dry AGM batteries are shipped with the electrolyte stored in a plastic container. The battery is filled with electrolyte from the container when it’s ready to be activated. AGM dry batteries have a shelf life of 5 years from the manufacturer as long as they remain sealed. A proper seal for AGM batteries means a foil sealing strip is in place on the battery without damage or flaw. Once a battery is unsealed, it should be activated, charged, and installed. If the battery is unsealed, the plates will begin to oxidize, making it more difficult to charge later.
Activating an AGM battery (BS) is simple and differs from the activation of a Conventional battery. Non-activated AGM batteries can be stored for long periods of time as long as they are kept in a cool, dry place and out of direct sunlight.
One should never remove the foil sealing strip covering the filler ports until the battery is ready to be activated. Do not use anything but the electrolyte container that comes with the battery for filling the cells as it is a higher concentration of sulfuric acid than that used in Conventional batteries.
It’s also important to note that not all electrolyte containers are created equal. Typically, each container has the proper amount of electrolyte for its specific battery. Always read the precautions and instructions on the electrolyte container before handling and filling your battery. Do not smoke when activating a battery or handling battery acid. Always wear plastic gloves and protective eye wear.

How to Activate an AGM Battery in 7 Easy Steps
- To activate an AGM Battery, the battery must be out of the vehicle and sitting on a level surface.
- Remove the electrolyte container from its plastic storage bag. Remove the strip of caps and set it aside as it will be necessary later in this process. When activating your dry AGM battery, use only the dedicated acid container that comes with the battery to fill the battery cells. This original container has the proper amount of electrolyte for your battery. This is important for service life and battery performance. NOTE: Do not pierce or otherwise open the foil seals on the electrolyte container. Do not attempt to separate the individual electrolyte containers.
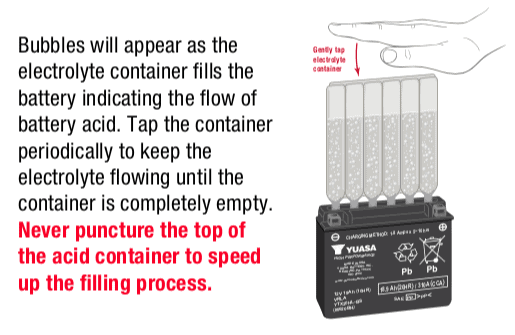
- Place the electrolyte container with the foil seals face-down into the cell filler ports on the battery. Hold the container level and push down to break the foil seals. This will allow the electrolyte to flow into the battery. Air bubbles will be seen inside the container as it empties. Do not tilt the electrolyte container.
- Check the electrolyte flow. Keep the container in place for 20 minutes or longer until it empties completely. If no air bubbles are coming up from the filler ports or if the container cells haven’t emptied completely after 20 minutes, then tap the container and/or battery case gently a few times to cause the electrolyte to flow into the battery. Do not remove the acid container from the battery until it is completely empty. The battery requires the entire electrolyte from the container for proper operation.
- Carefully remove the empty electrolyte container from the battery. Fully insert the strip of sealing caps (previously removed from the electrolyte container) into the battery filling ports. Make sure the strip of caps is fully inserted and flush with the top of the battery. Insert the caps by hand, do not use a hammer or excessive force. Never remove the strip of caps or add water or electrolyte to the battery during its service life.

- For batteries with ratings of less than 18 AH, let the battery stand for 20 to 60 minutes. For batteries with higher AH ratings or having the High Performance rating (designated by an “H” in the part number/name), allow the battery to stand for 1 to 2 hours. Yuasa AGM batteries have amp hour (AH) printed on the front of the battery case. The stand or rest period allows the electrolyte to permeate into the plates for optimum performance.
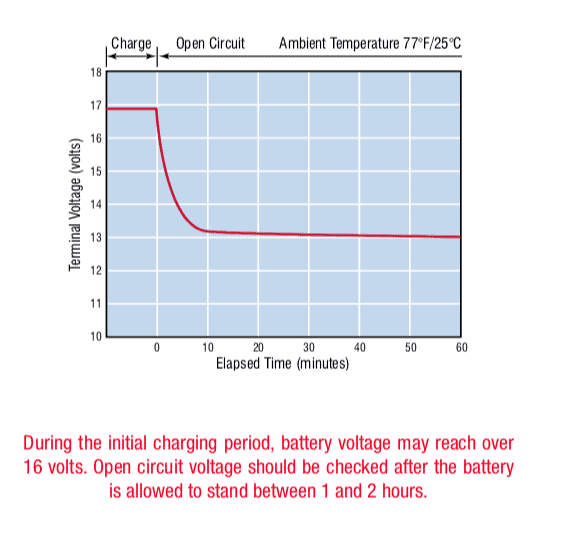
- You have nearly completed activating your AGM battery, the remaining step is to give it a full initial charge. After activating with the electrolyte, a new battery is approximately 75-80% charged. After the “stand” period described in step 6, charge the battery to bring it to a full state of charge. The battery charger used for initial charging should be able to charge at 12.8+ volts for an AGM battery. All Yuasa battery chargers are capable of reaching this minimum voltage and initializing/activating an AGM battery.
Activating a Yuasa AGM Battery is a simple, 7-step process that nearly any rider or mechanic can follow with success. Remember to always practice caution when handling batteries and activation equipment. The charger needs be selected appropriately, considering suitability for the battery. It is strongly recommended to use a certified Yuasa charger to charge Yuasa batteries.